Thursday, December 19, 2013

Winter Shadowbox DIY


In the winter and especially around the holidays it's fun to decorate your room.  In this post I am going to show you one way I decorated this season; with these sparkling, festive, winter shadow boxes!  I made a big one to sit on my dresser and a smaller one to hang on my wall.  You will learn how I created my shadow boxes so you know the basics and get some ideas of how to make and decorate your own!

Materials 

* All materials were purchased from Michael's craft store   


   ~Glittery background paper 


                                                                                        ~ Shadowbox frames                                                     

                                
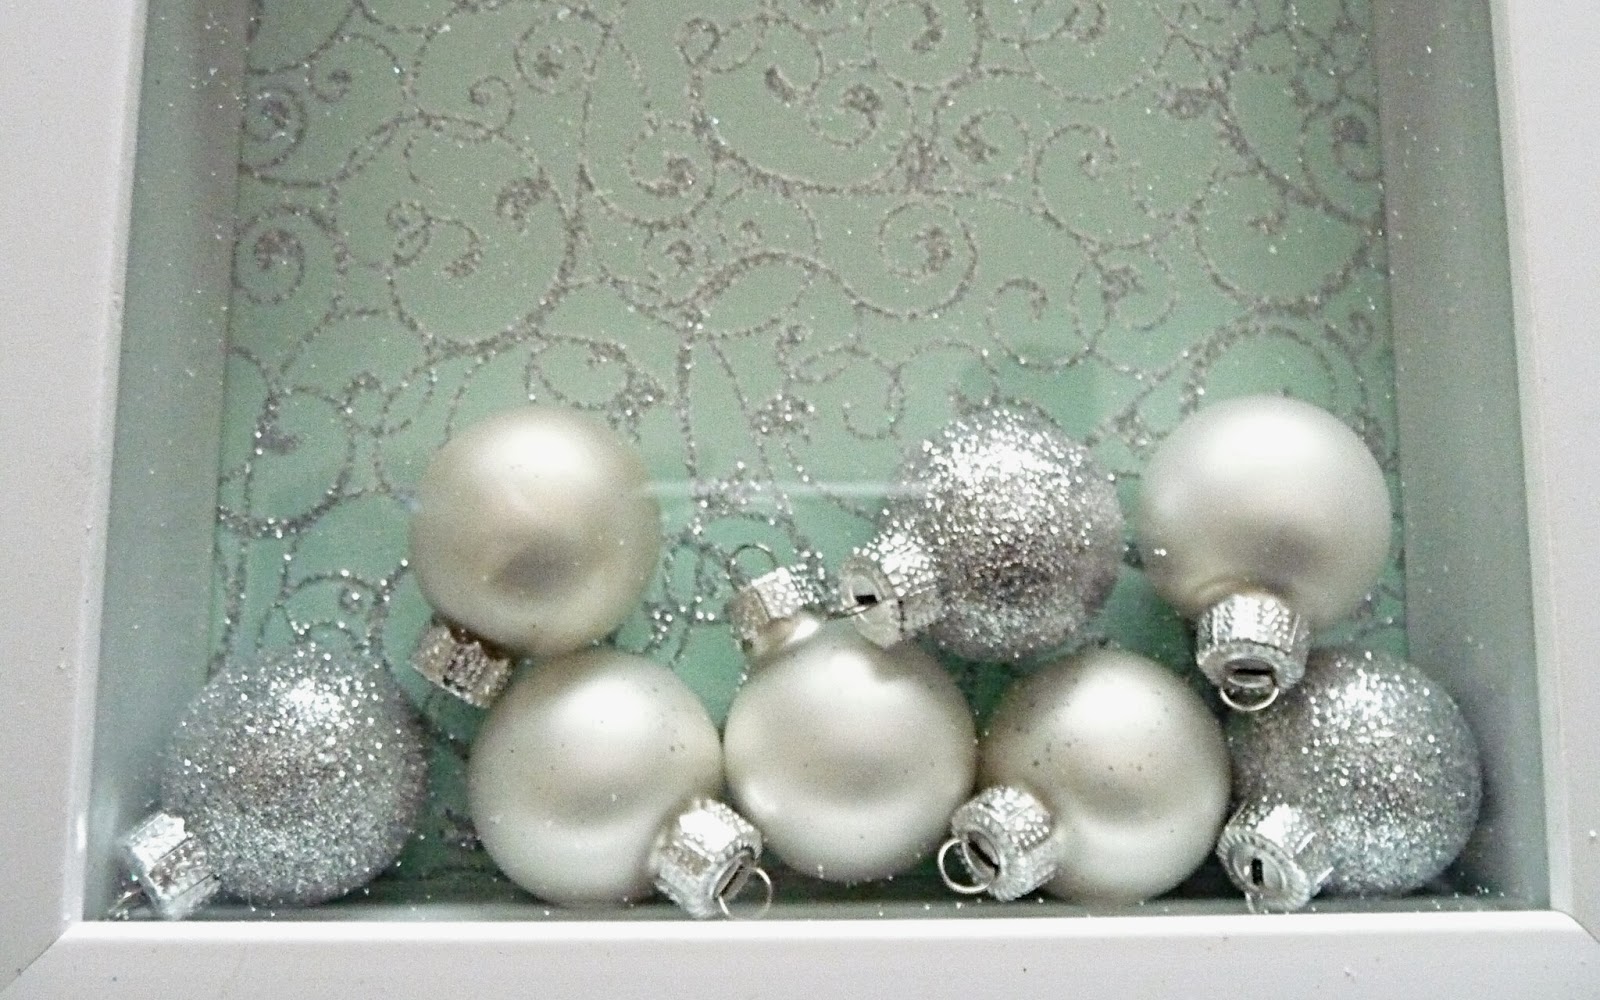
~Bottom fillers (I used jingle bells and mini ornaments)


~Things to hang (I used snow flake ornaments)


             ~Other decorations (I used ribbon and  sparkling leaves) 


                                                                  ~Lose glitter

I started with the larger frame, took the back off and traced it onto a piece of glitter paper.


I cut the paper out on the line and glued it on to the frame.  I took the top inside of the shadow box and hot glued ornaments so they would dangle inside the frame and let it dry.


To give the box a frosty look I mixed different colored glitters and smeared then on the inside glass part of the box.


Then, I filled the bottom of the box with jingle bells and closed it.


To add a finishing touch I hot glued ribbon around the edge of the frame.  Below is the finished product!


Now began to work on the second, smaller shadow box.  I repeated the step with the glitter paper and after filled the bottom of the box with mini ornaments and closed it.


To give the frame a little more sparkle I took one of the bunches of glitter leaves, laid  it out on the glass part of the frame, and hot glued it down.


So I would be able to hang the frame I hot glued a ribbon in a loop to the back top of the box.  Below is the second finished product!


 Winter shadow boxes are great decorations and make a perfect holiday gift to enjoy all winter long.  Have fun creating your own! 


Tuesday, December 10, 2013

Snowy Winter's day OOTD

Today I am going to do an outfit of the day to be worn on a snowy winter's day!  The focal point of this outfit is the sparkling cream colored sweater from Aeropostale which reminds me of snow. I am also wearing super light wash jeans from Hollister which have a winter ice coloring to them.  Of course you wear boots in the winter and I'm wearing my favorite, baby pink Uggs. To finish off the look I put on a snowflake neckless that I got as a gift and the outfit is complete!  This outfit has a winter snow like sparkle and will keep you warm and cozy on a snowy winter's day.  The items mentioned that are still   available are listed below. 


Links

Hollister Light wash Jeans

Baby pink Uggs


Thursday, December 5, 2013

Gluten Free Vegan French Toast Cupcakes


 Being Gluten free and Dairy intolerant can be tough this time of the year with so many holiday desserts all over the place containing wheat and dairy. But, today I present you with this delicious recipe for gluten free Vegan french toast cupcakes! Also, with a streusel crust and maple syrup frosting!  Sounds like heaven right?  Well it tastes like heaven too! 

Ingredients 

The Streusel
1/2 cup brown sugar, packed  
1 tbs sugar
1/2 cup gluten free all purpose flour 
1/2 teaspoon cinnamon
1/4 teaspoon salt
5 tbs cold vegan butter 
  
 The Cupcakes
1 and 1/2 cups gluten free all purpose flour 
~ 1/2 cup quinoa flour
~ 1 cup sweet sorghum flour
~ 2 cups sugar 
~ 1 tbs baking powder
~ 2 teaspoons cinnamon
~ 1/2 teaspoon nutmeg
~ 1 teaspoon salt
~ 1 cup vegan butter
~ 1/2 cup soy milk
~ 3 bananas
~ 1 tbs vanilla 

 The Frosting
~ 1/2 cup vegan butter 
~ 1 teaspoon vanilla 
~ 1/4 teaspoon salt
~ 1/4 cup maple syrup  
~ 1/2 tbs soy milk
~ 1/2 cup sugar 
~ 1 cup confection sugar       
~ 1/2 cup brown sugar


First make the streusel: Combine the brown sugar, sugar, gluten free flour,cinnamon, and salt in medium size bowl.


 On a separate plate chop the vegan butter. I used Earth Balance vegan buttery sticks.


Then, mix the butter with the dry mixture until fully combined (It should look like the picture below).  Cover the mixture and stick in the fridge.


Now start on the cupcakes: preheat the oven to 370 degrees F.  In a large bowl mix gluten free flour, quinoa flour, sorghum flour, sugar, baking powder, cinnamon, nutmeg, and salt.  The brand that I used for the sweet sorghum flour, gluten free all purpose flour, and quinoa flour is Bob's Red mill.  Also the sugar I used was Woodstock organic cane sugar


Now add in the wet ingredients; 3 bananas, vegan butter, soy milk, and vanilla.  The soy milk I used was Westsoy low fat vanilla soy milk.      


Mix until fully combined (It should look like the picture below).


Now line 2 baking pans with cupcake liners and spray with non stick oil (a lot).  Then, put  3 tbs of batter in each liner.


Take the streusel out of the fridge and cover the top of each cupcake with it. Put one pan into the oven for 20 min at 370 F, but keep checking them because they may be too cooked or too raw at 20 min. 


While the cupcakes are baking start on the icing: Chop the vegan butter and beat on high until it looks like the picture below.


Now you add in the soy milk, sugar, confection sugar, brown sugar, maple syrup, vanilla, and salt to the mixture.  Beat on high until it looks like the picture below.  This should take 2-5 minutes.  Then place in the fridge until the cupcakes are ready to ice.


When the cupcakes come out of the oven they should look like the picture below, wait for them to cool completely before icing.


Take the icing out of the fridge and spread on the cupcakes with a knife.  Sprinkle on some cinnamon sugar and your done! 


These cupcakes are like french toast but better with cinnamon and maple syrup frosting!!  A great dessert to bake for a holiday party or maybe even one day for breakfast, (I mean they are french toast cupcakes)!  These are so delicious and come out perfect every time.  Happy cooking! 


Friday, November 8, 2013

Fall Studded Nail Tutorial


I always like to do my nails in colors and looks according to the season, so today I came up with this studded nail design for the fall that I will explain how to create in this post.


First I painted all of my nails except my ring finger with Essie's color 624 called Mink muffs.  On the ring finger I painted that nail with Essie's color 704 called Sew psyched. Then I applied a second coat once the colors dried.


Once my nails had dried completely I used my Love Aero studded nail stickers from Aeropostale.  To apply them I found the sticker that fit best with each nail and stuck them on.  Afterwords I needed to cut them to shape, then my nails were complete!


Here is the finished product!  This nail design is pretty for the fall with the neutral colors.  Also the studs are a great contrast giving the design a little bit of an edge and shine.  I hope you enjoyed my nail tutorial and if you happen to recreate it show me using the hashtag #beautyybychloe and all the products I used that are still available will be listed below.

Items Used 

Essie nail polish color 624 Mink muffs

Essie nail polish color 704  Sew psyched


Tuesday, October 29, 2013

Halloween makeup, Dorothy from The Wizard of Oz


Today I'm going to explain how to achieve this Dorothy from The Wizard of Oz makeup look just in time for Halloween.

First I started out by applying my Maybelline New york dream fresh BB cream in the shade Medium/Deep sheer tint.


Then I followed by applying my Maybelline New York concealer in color 15 Fair/Clear underneath my eyes.


Next I applied my Neutrogena shine control powder in shade 10 Invisible.


Then I brushed out and filled in my eyebrows using my master shape eyebrow pencil in the shade Deep Brown by Maybelline New york.


Afterwords I started with the eyeshadow and applied Shade 1 in the Revolon photo ready pallet 525 Avant-Garde all over my lid.


To finish up the eyes I took Shade 3 from the same pallet and applied it in both my inner and outer crease and then blended.


Afterwords I began applying my NYC Sky rise mascara in shade 842 Extreme Black.


For the lips I applied my Maybelline New york lipstick in shade 625 Are You RED-DY.


Now for the finished Look.....


That would conclude my Dorothy from The Wizard of Oz makeup look.  I hope you are inspired to recreate this look for your own! The links for all the products available will be linked below and have a very Happy Halloween!

Maybelline Dream fresh BB cream 

Maybelline Fit me concealer

Maybelline Master shape brow pencil

Maybelline Color sensation lip color

Neutrogena Shine Control powder

Revlon Photo ready pallet

NYC Sky rise mascara


Pink Double Sketch Heart